What are Workers?
In Black Desert Online, workers are people that you can hire to perform work for you. Workers are most commonly used to gather resources from nodes that you have invested contribution points into or assigned to craft items in workshops that you have. Each worker belongs to a town and you cannot move them between towns. You also do not need to pay any salary to your workers.
In this BDO workers guide, I will go over the types of workers in the game, explain their experience tiers, how to get them and use them, and what their stats and skills mean.
Types of Workers
There are three common races of workers currently in Black Desert Online. They are human, goblin, and giants. As you can see from the stats below the main difference is between them is their work speed and stamina, with the goblins having the best work speed and the lowest stamina and giants having the best stamina and slowest work speed.
Humans are in between goblins and giants in regards to work speed and stamina, but they excel in their luck stat. It theorized that the luck stat has something to do with the amount of secondary items workers can get from gathering nodes, but this has not been proven as far as I know.


In addition to these types of workers, there are special Papu workers who are native to the Grana area and can only be hired there.
Workers Levels and Tiers
Every worker starts at level 1 and can gain experience to level up to level 30. Workers gain experience simply from completing work tasks you assign them. As a worker gains levels, his statistics increase and he starts gaining special abilities, one ability every five levels. You can see each worker’s stats and skills by hovering the mouse over the picture of the worker in the worker screen.
The workers are then also divided into five grades which are: Naive, Basic, Skilled, Professional, and Artisan. At every 10 levels, a worker can perform a promotion test to attempt to move into the next grade. If successful, the worker will move up a grade, get his level reset to level 1, and lose his abilities. The worker will then regain abilities every five levels, but there is no guarantee that he will get the same ones again.
There are a few theories on the best way to promote workers. Personally, for basic and skilled workers I prefer to wait until they are at level 20 before attempting to promote them, but I attempt to promote professional workers the first chance I get.
If a worker hits level 30 and fails his last promotion test he is then stuck at that grade. But you can always fire your worker and rehire another one to try to get them to the top grade.
How to Get Workers and Lodgings.
Lodgings
Before getting a worker you first need to have lodgings for your workers in the town you want to hire them. Each town has lodgings for one worker for free. You can get more by investing contribution points into houses with additional lodgings for your workers.
The simplest way to find houses that offer lodgings is to use the “house sorting bar thingy” that is located in the top right corner whenever you open up a town screen. Select lodging in the middle tab and you will be shown all the buildings that have lodgings available. You now just need to click on the house, select lodgings from the list, and purchase it. A minute later you will have gotten your first extra lodging for a worker to use. Remember to level up the loggings if you have that option.
Workers
There are two ways of getting workers. You can either buy them from the worker exchange if some happen to be available in the correct town or you can find a worker contractor (shown as a pickaxe symbol on town map) which can offer you a contract with a worker.
Each contract offer you request will cost 5 energy and unless it’s your very first worker you should consider only accepting skilled workers or even try for higher-tiered workers. Never accept a naive worker as they cannot be upgraded. Also, when asking worker contracts, you should always have at least 90.000 silver available in your inventory should a professional worker show up.
How to Use Workers.
To be able to use your workers you need to have invested in either a production node or a workshop in some town. To use the worker, you just need to select the node, chose the worker you want to use from the list which appears, select the number of consecutive jobs you want to run and then simply press start. For each action the worker performs, a single point of stamina is lost. To regain that stamina you need to feed your workers.
How to Feed Workers
To restore stamina the worker must be given worker food, which are:
- Beer
- Cheese Pie
- Freekeh Snake Stew
- Fish Filet Chip
- Grilled Bird Meat
- Oatmeal
The most commonly used of these is beer and it’s really easy to make. If you don’t know how to make beer then check out this guide on making beer in BDO. To feed your workers you first need to have some of these foods in your inventory. Next, you need to open the worker screen by press the worker button located in the top left corner of your screen. The button is circular with a pickaxe.
Once opened you can press “Recover all” at the bottom of that screen, select the food you wish to feed to your workers and press confirm. This will feed all your workers to max stamina. You can also manually feed them by using the yellow button next to the worker in the worker list.
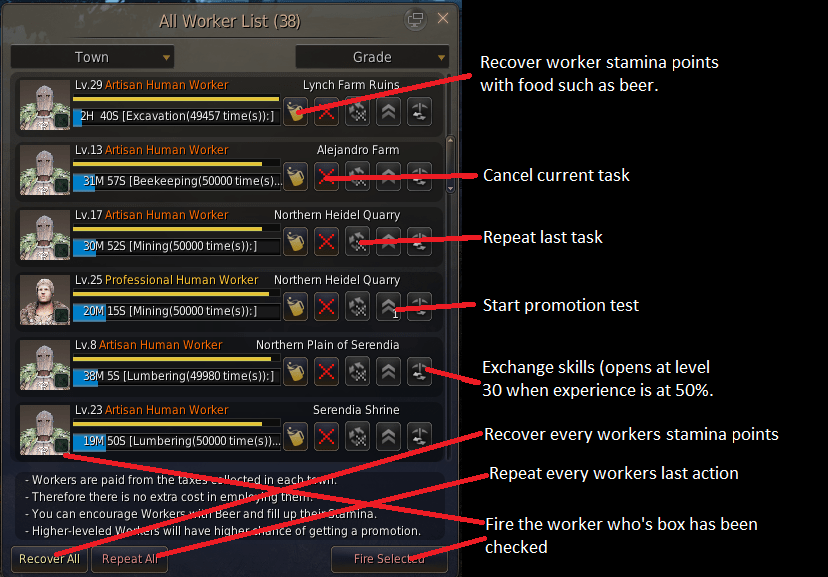
Explanation of Worker Stats, Skills and the Worker Screen
The worker screen is a special screen you can access to get a quick overview of your workers, their level, if they are available for promotion tests and if they are working or idle. Below you can see the screen and what each button does.
Worker Stats Explained
Work speed: The higher this number the faster your workers are able to complete a task. This number is the work points the worker can complete in a session. Just how this works is a bit confusing and will be explained in detail below.
Movement Speed: The speed of your worker when traveling to the location where he has been assigned a task.
Luck: In theory, this stat should increase the chance of getting secondary items from nodes and blue items from production. As far as I know, it has never been confirmed.
Stamina: Each work action requires one stamina regardless of how long it takes. So, for example, a worker with 21 stamina can perform 21 collections before needing to restore his stamina.
Experience: Whenever a worker completes a job he gains experience and with increased levels come extra skills, better stats and the ability to promote to a higher tier.
Worker Skills Explained
Each worker can have 7 skills, they start with one and receive another every 5 levels. The skills available to the worker depend on his tier and the best skills are reserved for artisan workers only. Below you can see a list of the skills and what the minimum tier for each skill is. When a worker reaches level 30 and is either artisan or has failed all promotion tests you can change the skills he has when he reaches 50% experience. In some cases, you can change a single skill and keep the benefits you got from it. For example, if you exchange skills that increase stats as you level such as legwork you do not lose movement speed. However, if this is because the skill never worked in the first place is anyone’s guess.
List of Worker Skills, Minimum Tier and Explanations
| Skill | Minimum Tier | Explanation |
|---|---|---|
| Adv. [Type] Production skill | Artisan | Each workshop action results in four produced materials of the type listed. You will still need the required materials for all four so this skill simply increases the worker productivity. |
| Adv. [Type] Packing Skill | Artisan | Each workshop action results in four produced trade items of the type listed. You will still need the required materials for all four so this skill simply increases the worker productivity. |
| [Type] Production Skill | Professional | Each workshop action results in two produced materials of the type listed. You will still need the required materials for all four so this skill simply increases the worker productivity. |
| [type] Packing Skill | Professional | Each workshop action results in two produced trade items of the type listed. You will still need the required materials for all four so this skill simply increases the worker productivity. |
| [Type] Knowledge | Naive | Increases work speed by +5 for that type of work |
| Craftsmanship | Skilled | Increases work speed by +0.2 when leveling up. Work speed not lost if exchanged. |
| Leg Work | Skilled | Increases movement speed by +0.5 when leveling up. Work speed not lost if exchanged. |
| Lucky Guy A | Skilled | Increases luck by +1.0 |
| Lucky Guy B | Basic | Increases luck by +0.7 |
| Lucky Guy C | Naive | Increases luck by +0.4 |
| Wings A | Skilled | Increases movement speed by +11% |
| Wings B | Basic | Increases movement speed by +8% |
| Wings C | Naive | Increases movement speed by +6% |
| Quick A | Skilled | Increases movement speed by +10% |
| Quick B | Basic | Increases movement speed by +7% |
| Quick C | Naive | Increases movement speed by +5% |
| Simple A | Skilled | (Work Speed +2.0) |
| Simple B | Basic | Work Speed +1.5 |
| Simple C | Naive | Work Speed +1.0 |
| Thrifty A* | Skilled | 10% chance of returning 10% of 1 material during crafting. Material type needs to have at least 10 items to work. |
| Thrifty B* | Basic | 7% chance of returning 10% of 1 material during crafting. Material type needs to have at least 10 items to work. |
| Thrifty C* | Naive | 5% chance of returning 10% of 1 material during crafting. Material type needs to have at least 10 items to work. |
| Work Supervisor A | Skilled | Work Speed +3 |
| Work Supervisor B | Basic | (Work Speed +2) |
| Work Supervisor C | Naive | Work Speed +1 |
| Blessed Hand | Skilled | Increases luck by +0.2 when leveling up. Luck not lost if exchanged. |
| Masterly Skill | Skilled | Enhance work speed +2 |
(*) The thrifty skill only works if you need at least 10 materials of a single type to produce the desired item. It should work for Manos when producing Manos Coral Belts but it won’t work when producing a shining fluid collector.
Total Work Time Explained
Travel time
Whenever you open a job for a worker, you get a calculation of the time needed for the selected worker to complete the job. This time is the total work time and is calculated by combining the travel time and the work time for the task.
The travel time for each job is easy to calculate. Just take the distance*2 and divide it with the worker’s movement speed. For example, A job has a distance of 2000 and the worker has a speed of 4.33 this means that the travel time is 2000*2/4,33 = 924 seconds = 15 minutes and 24 seconds. So quicker workers spend less time traveling to and from their worksite.
Work time
The work time for each job is nonlinear and separated into tiers. Your worker can perform a certain amount of work for a working session. Each session lasts 10 minutes if gathering or 5 minutes if producing goods in a town. Your worker’s work speed is the amount of work your worker can perform each session. To complete a task the total work performed must go over the required workload of the task.
Let’s use an example to explain this better. A worker has a work speed of 150 and you want him to do a gathering task that has a workload of 310. You assign the worker and the worker then travels to the site and starts working.
After 10 minutes he completes 150 work points. and after another 10 minutes, he has completed a total of 300 work points. Since the workload is 310 the worker will then need to spend another 10 minutes to get the total work points above 310, or in this case to 450, taking a total of 30 minutes to complete. The extra 140 work points which were not needed are just lost. If the worker’s work speed had been 155, then the task would only have taken 20 minutes.
Total Work Time
You can find the total work-time by using the following method.
How to Find Total Work time
- Find the Total Traveling Time
a) Find the travel distance to the worksite.
b) Find the workers movement speed.
c) Take distance number, divide it with the movement speed number and multiply that number with 2. This is your worker’s travel time in seconds
c) Divide the seconds in c) with 60 to get the minutes. - Find the Work Time
a) Find the total workload
b) Find the worker’s work speed
c) Divide the workload with the work speed and round up to the next whole number. (ex. 310/150 = 2,06, round up to 3.
d) Take the number from c) and multiply it with 10 for a gathering task or 5 for an in-town production task. - Find the Total Work Time
Add together the minutes from part 1. and 2. You now have the total work time for a task.
How to Optimize Workers
Knowing how a worker’s worktime is calculated allows you to optimize your workers for peak efficiency. You can now move workers around so that the work lost each session is minimized. For example, having an artisan goblin produce copper ore crates is a massive waste since a skilled giant can do the job nearly as fast. The trick is to try to get your workers assigned to tasks where the workload is just under the total work points for any number of complete sessions. Or simply put, you want the number from 2.c) to be just below a whole number (2.95 is better than 3.05).
You can also try to optimize for distance, where you have your quickest workers do the tasks that are furthest away from their starting point.
Or you can simply just use goblin workers and stop worrying too much about this to much.
So that’s about all there is when it comes to workers in BDO. If you liked this worker guide then please share it with your friends and allies and feel free to check out my other Black Desert Online guides.
The Masterly Skill is available for professional workers as well (I have a Professional Goblin Worker with said skill).
Are you 100% sure that you don’t lose the stats of Blessed Hand, Craftsmanship and Leg Work if you exchange them later on? I’m kinda worried about exchanging them on my workers^^
Edit: The Masterly Skill is available for general workers as well (I Just got a green giant worker with said skill)
Hi Kurozake.
As far as I can tell, it either has no effect to begin with or you do not lose the stats if you change them out.
This of course could be a hidden stat, which means I would need to find a job that would change tiers when I drop this skill. I’ll see if I can find such a precise circumstance to test this, but my gut tells me that this skill is inactive.
Hi Saarith,
I got to reroll a skill on my Artisan Human Worker, and it was exchanged into “Craftmanship” – increase work speed when leveling up. As my Artisan is lvl 30 already, would this skill work in any case or worth keeping? Thanks!
Are the skills factored in when it lists the total work time? For example, if you have a [Type] Knowledge skill will that be taken into consideration when it shows total work time for that type of node ?
That’s a really good question.
It should be like that, but it’s always possible that it’s bugged. I will do a test soon to see if this works as intended.
Jess.
I took a look at it and if you compare the work speed listed on your worker and the work speed shown when you are starting a job, you see the added speed reflected there.
So yes, the skills are added to the workspeed.